CONTENTS
| INTRODUCTION | 2 |
| Lubrication | 3 |
| Physical dimensions | 4 |
| Technical specifications | 5 |
| STANDARD INSTALLATION KIT | 6 |
| WARNINGS | 7 |
| INSTALLATION OF THE UNIT | 8 |
| Initial preparations and mounting the base plate | 8 |
| Mounting the rack | 9-10 |
| Connecting the 220V AC electrical supply | 11 |
| Other connections | 12 |
| Circuit board layout | 13 |
| Programming remote controls | 14 |
| Reversing the electrical motor direction | 15 |
| Setting the townhouse function | 15 |
| Infra-red beam follower | 16 |
| Obstruction sensitivity adjustment | 16 |
| Setting the auto close dip switches | 17 |
| OPERATING PROCEDURES | 18 |
| Initial testing procedures after installation | 18 |
| Daily operation | 18,19 |
| Buzzer / LED Status | 20 |
| TROUBLE SHOOTING GUIDE | 21 |
| Problems during the installation / operational phase | 21-24 |
| MAINTENANCE | 25 |
| Replacing the remote control battery | 25 |
| Replacing the pulse sensor | 26 |
| STANDARD GUARANTEE | 27 |
| WARRANTEE / REGISTRATION CARD | 28 |
| THE FOLLOWING PATENTS APPLY : 2007/06773 | |
-Page 1-

INTRODUCTION
The GEMINI DC Sliding gate system is a self-contained unit, which comprises of a Direct Current electrical motor that drives the rack pinion through a reduction gearbox. The electrical motor, gearbox, and associated components are incorporated in a base box. The base box is secured to the base plate that needs to be cemented or bolted to a concrete base. The complete unit is enclosed with a weather resistant lid.
The GEMINI system is rigidly built for reliability, but with safety a first priority. The electronic control card makes provision for several unique features, such as remote controlled gate opening, pedestrian opening facility, obstruction (“impact” ) sensing, adjustable “auto close” facility, infra-red obstruction sensing facility, townhouse function, beam follower, buzzer (optional), soft start and normal push button operation. The features are updated from time to time.
A battery (ies) is used as the power source for the electrical motor. A 220V trickle charger maintains the battery in a fully charged state. The 220V current for the power supply is derived from a normal 220V mains supply.
Contact us:
- DMI Engineering, PO Box 36816, Menlo Park, 0102
- 406 Asetileen Street, Silvertondale, Pretoria, 0184
- Tel: 012 7423950
- Fax: 012 804 1794
- E-mail: [email protected]
- Website: www.gemini-gates.co.za
-Page 2-

LUBRICATION
VERY IMPORTANT

REMEMBER TO FILL YOUR GEMINI OPERATOR WITH OIL BEFORE OPERATION

B
A
To fill your GEMINI gate motor with oil, remove screws marked A and B.
Pour the oil into the hole marked A as depicted below.
Hole B only acts as a breather hole.

Replace the screws in position A and B, your GEMINI is now ready for operation
-Page 3-

PHYSICAL DIMENSIONS

Top View Side View
-Page 4-

| TECHNICAL SPECIFICATIONS | ||
| Motor: | DC | |
| Gate speed: | 12 to 23 meter per min depending on specifications of | |
| gate. | ||
| Limit switches: | Built in software as well as mechanical stops. | |
| Obstruction: | Electronically adjustable obstruction sensing in both | |
| directions. | ||
| Activation: | By using any normally open contact, push button or | |
| remote control. | ||
| Other | 1. | Automatic closing facility |
| characteristics: | 2. | LED display for gate mode |
| 3. | Buzzer during gate movement (optional) | |
| 4. | Infra-red beam sensing compatible | |
| 5. | Pedestrian open / close facility | |
| 6. | Mechanical override in case of a malfunction or | |
| power failure | ||
| 7. | Soft start and stop | |
| 8. | Infra-red beam follower | |
| 9. | Town house function | |
| Weight: | ±14-15 Kg (Includes base plate, excluding rack) | |
| Battery: | 7Ah or 12Ah sealed lead-acid type, maintenance free. | |
| Maximum gate | 300kg* for 7Ah , 600kg* for 12Ah | |
| weight: |
*Provided that track wheels with a minimum diameter of 80mm, fitted with roller bearings on a straight and level track is used. Gate must move with ease.
Applications:
For 10 kg pull force or less use 7Ah For 18 kg pull force or less use 12Ah
-Page 5-

STANDARD INSTALLATION KIT
Your GEMINI DC sliding gate system comprises of the following:

| 1. | Weather resistant lid | 8. | Baseplate with attachment | |
| bolts | ||||
| 2. | Steel Rack** | 9. | GEMINI electronic control card | |
| 3. | PCB cover includes 3 x spare fuses | 10. Electric motor | ||
| 4. | Stoppers | 11. | Power supply | |
| 5. | Gemini Remote Transmitters** | 12. | Keys x 2 | |
| 6. | Angle iron brackets (weld item)** | 13. Gearbox clip | ||
| 7. | Manual override lever | 14. | Battery | |
| 15. Oil Bottle (40ml) |
**Rack sold separately. Steel or nylon rack can be used.
-Page 6-

WARNINGS
IMPORTANT SAFETY INSTRUCTIONS:
MAKE SURE THAT THE GATE YOU FIT THIS UNIT TO WILL UNDER NO CIRCUMSTANCES OVERRUN ITS TRACK. EVEN BY BRUTE FORCE!
- NEVER WORK ON THE SYSTEM WITH THE ELECTRICAL POWER ON.
- NEVER ALLOW PERSONS OR ANIMALS TO STAND ON THE GATE OR TRACK WHILE THE GATE IS IN MOTION.
- KEEP HANDS CLEAR OF THE RACK AND PINION GEAR WHILE THE MOTOR IS IN OPERATION.
- DO NOT ALLOW ANYONE TO PUT THEIR HAND THROUGH THE GATE TRELLIS WHILE GATE IS MOVING OR ABOUT TO BE ACTIVATED.
- TEST ALL OPERATING SYSTEMS ON A REGULAR BASIS, ESPECIALLY THOSE RELATED TO THE SAFETY FEATURES I.E. OBSTRUCTION SENSING AND IR BEAMS
- DO NOT ALLOW CHILDREN TO PLAY WITH THE CONTROLS.
- KEEP REMOTE CONTROLS AWAY FROM CHILDREN.
- IT IS MANDATORY TO INSTALL INFRA RED BEAMS OR SIMILAR SAFETY DEVICES IN SUCH A MANNER AS TO PREVENT OPERATION OF THE SYSTEM WHEN THERE IS A CHANCE OF THE GATES COLLIDING WITH A VEHICLE OR PERSON OR ANIMALS.
INSTRUCTION
TO RELEASE
– open handle and move gate manually.
Beware that the gate can move freely in any direction.
TO RE-ENGAGE
– close handle and move gate by hand until gearbox engages
Also see p.20
-Page 7-

INSTALLATION OF THE UNIT
WARNING: IMPORTANT SAFETY INSTRUCTIONS
Follow these instructions since incorrect installation can lead to severe injury.
Before installing the motor, check that the gate is in good mechanical condition, correctly balanced and opens and closes properly.
INITIAL PREPARATIONS FOR MOUNTING THE BASE PLATE
To determine the mounting position of your GEMINI, fully close the gate and place the unit (with base plate attached) in position so that the pinion gear is approximately 15mm away from the gate. Ideally locate the base plate against the existing gate track (the base plate is to be welded to this track at a later stage).
NOTE: The securing holes in the base box are slotted; ensure that the base plate bolts are located in the centre of these holes and that the base box and base plate are parallel.
Ensure that the centreline of the gate is parallel with the centreline of the pinion. This will ensure that the centreline of the rack will run on the centreline of the pinion. Clearly mark the position of the base plate. Remove the complete unit and prepare a foundation for base plate. Consult your local Builders Supply Store for the necessary information on concrete strengths, mix ratios and hardening times.
NOTE: Install conduit piping in the foundation to correspond with the opening in the base box, through which the electrical cables are routed.
Remove the base plate from the unit. Place and stitch weld the base plate to the existing track.
Cast concrete into the previously prepared foundation. Ensure that the exact position (previously marked) is maintained to ensure correct mounting of the unit. The base plate can also be mounted in position by means of fasteners onto an existing concrete foundation.
Mount the GEMINI on the base plate and align as previously described. Also ensure that the height adjustment nuts are at exactly the same level to ensure even distribution of forces on the base box.
-Page 8-

MOUNTING STEEL RACK

Figure 1
Starting at one end of the gate, weld the rack in position by using the angle iron brackets. The following critical points must be considered:
- Please note that it is mandatory to install stoppers as indicated in figure 1.
- Mount mechanical stops to one end of loose rack as per drawing. Now position assembly as per figure 1.
- Angle iron brackets, not to be more than 600mm apart, can now be utilised to attach rack to gate.
- Allow a free play of approximately 2mm between the pinion and the rack.
- When moving the gate to the next position, the manual override lever must be disconnected free movement of gate.
- For wooden gates, drill two holes in the angle iron bracket and secure to the gate with wood screws. To prevent the gate from burning, mark the position of the angle brackets and weld to rack before securing to the gate.
-Page 9-

MOUNTING NYLON RACK
Mount a mechanical stop at one end of the nylon rack as per Figure 2. Drill and screw the nylon rack onto the gate, ensuring that there is approximately 2mm free play between the pinion and the nylon rack. Mark and drill each corresponding mounting hole on the rack, ensuring that approximately 2mm free play is maintained. Screw the rack to the gate. Bolt stoppers to the gate by means of M6 x 90 bolts and nuts as per figure 2. Alternatively the stopper could be welded onto the gate.

Figure 2
Once the rack is in position (Steel or nylon), ensure that the unit (pinion) is correctly aligned with the rack. Final adjustments can be made by sliding the unit in the slotted holes to achieve the correct alignment. Tighten the mounting nuts. The remaining stopper can now be attached to the rack in such a position that it prevents the gate from overriding the fully open or closed position.
This stopper system is Patent pending (2007/06773)
-Page 10-

CONNECTING THE 220V AC ELECTRICAL SUPPLY

Figure 3
CAUTION:
Under no circumstances must the main electrical supply be wired directly from a power source. As a safety precaution, an ON/OFF switch must be incorporated into the electrical circuit, normally within 1 meter from the unit.
- ELECTRICAL CONNECTIONS SHOULD BE DONE BY A QUALIFIED ELECTRICIAN IN ACCORDANCE WITH APPLICABLE REGULATIONS
-Page 11-

OTHER CONNECTIONS
Battery
Make sure the red wire is on + and the black wire on –
Push button
Connect to removable connector block COM and TRIG marked on PCB, see p13
Pedestrian push button
Connect to removable connector block COM and PED marked on PCB, see p13
Infra-red sensor
Connect to removable connector block
COM and IR BEAM marked on PCB, see p13
Keypad
Connect to removable connector block
COM and TRIG or PED (optional) marked on PCB,
see p13
Additional receiver
Plug in on electronic control card marked RECEIVER PLUG.
LED
Point available for extending status LED to a remote location.
Auto close loop
When the loop is removed the auto close function is disabled.
220V light
a 220V light can be switched on by the PC Board.
See diagram below.
12/24V supply
Additional 12/24 volt point available to provide power for infra-red beams or keypad, etc. (Max 1 Amp)

-Page 12-

CIRCUIT BOARD LAYOUT
Ensure that all the legal requirements for your local area are complied with.
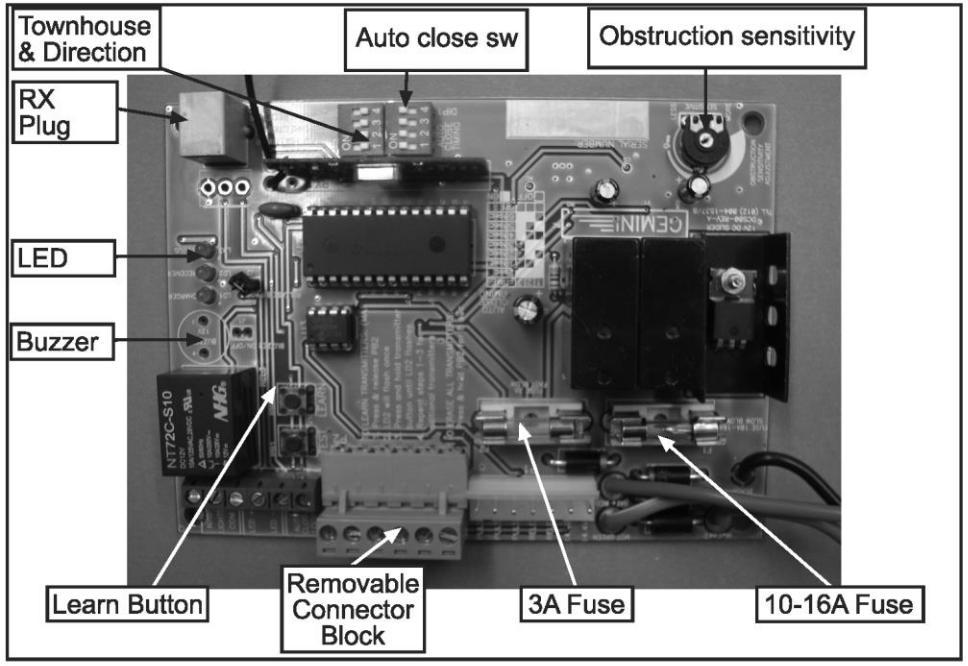
Figure 4
-Page 13-

PROGRAMMING A GEMINI CODE HOPPING
REMOTE CONTROL
Important: The transmitters and receiver supplied with this motor have already been programmed. Only additional transmitters and receivers need to be programmed.
Once the electrical supply is correctly connected, the additional transmitters can be programmed.
If a non-GEMINI remote control is used, program the control as per the supplier’s instruction.

| LEARN Button | Figure 5 |
To learn the transmitters (Maximum of 15):
- Press and hold transmitter(remote) button
- Press and release the learn button on the PCB
- Receiver LED on PCB will flash twice
- Release transmitter button after led flashed twice
- Repeat steps 1-3 for additional transmitters
To erase all transmitters:
- Press and hold the LEARN button for 10 seconds or until receiver LED turns off.
-Page 14-

MOTOR DIRECTION
REVERSING THE ELECTRICAL MOTOR DIRECTION
Refer to the electrical diagram (figure 6). The electrical motor direction default is set by positioning the gate direction dipswitch on the electronic control card either to the left or right.
TOWNHOUSE FUNCTION
The townhouse function allows the gate to open completely without accepting any commands from any source other than obstruction sensing.
Refer to the electrical diagram (figure 6). The townhouse function is set by positioning the townhouse dipswitch on the electronic control card either to the ON or OFF position.

Figure 6
-Page 15-

INFRA-RED BEAM FOLLOWER
This function operates only when the gate is opening. It allows the gate to stop when the beam is interrupted. The gate will remain in this position until the obstruction has been removed from the path of the beam and will then close.
OBSTRUCTION SENSITIVITY ADJUSTMENT

Figure 7
Obstruction sensing should be set so that the gate will stop and reverse on impact while closing. The obstruction sensitivity is set at the factory, but it will be necessary to adjust the sensitivity to suit your gate’s requirement.
Obstruction sensitivity is adjusted by adjusting the sensitivity potentiometer on the electronic control card (See figure 7). If adjustment is required, insert a small flat tip instrument type screwdriver into the potentiometer adjustment slot and adjust as follows:
- Turn the potentiometer clockwise to make sensitivity LESS
- Turn the potentiometer counter-clockwise to make sensitivity MORE
Test impact sensitivity by bumping the gate by hand in the opposite direction of movement, re-adjust until the ideal impact sensitivity is achieved.
-Page 16-

SETTING THE AUTO CLOSE DIPSWITCHES
After your GEMINI unit has been installed and you wish to alter the time delay for the auto close facility, proceed as follows:
0 = Off

1 = On
| SWITCH NO. & | TIME DELAY |
| POSITIONS | (in seconds) |
| 0000 | Off |
| 1110 | 2 |
| 1000 | 10 |
| 0100 | 20 |
| 1100 | 30 |
| 0010 | 40 |
| 1010 | 50 |
| 0110 | 60 |
Figure 8
SETTING THE AUTO CLOSE DIPSWITCHES (CONTINUED)
The dipswitches are marked No. 1 to 4 (See figure 8) Refer to table on page 18.
Choose a time delay to suit your personal requirements, i.e. 50 seconds; dip switch settings must be 1010.
Move the no.1 dipswitch to the ON position, the second switch the OFF position, the third switch to the ON position and the fourth dip switch to the OFF position. Your 50 second Auto Close time delay is now set.
Removing the Auto Close Loop on the electronic control card will disable the auto close function even if a time delay is set.
-Page 17-

OPERATING PROCEDURES
INITIAL TESTING PROCEDURES AFTER INSTALLATION OR DISENGAGING
- Disengage the manual override lever and move the gate to the halfway position. Re-engage the override lever. Ensure that the gearbox has re-engaged by moving the gate until a clicking sound is heard.
- Press the remote control button. The gate must move to the closed position at slow speed and stop. If necessary, adjust the stopper position on the rack.
NOTE: If the gate moves to the open position on the first activation, the electrical motor direction is incorrectly set and must be reversed. Refer to “Reversing the Electrical Motor Direction” on page 16 for the correct procedure.
- The gate will remain in the closed position until activated. Gate will then move to the open position at slow speed and stop. If the stopper has been moved, disconnect the power (battery and charger). The motor will re-learn the stopper locations.
- Perform an obstruction-sensing test. If necessary, refer to
“Obstruction Sensitivity Adjustment” on page 17 and adjust the obstruction sensitivity.
- Test the operation of the gate from inside the house by using the push button
DAILY OPERATION
- The gate can now be operated by either the remote control or the push button inside the house.
- If either the remote control or the push button is pressed while the gate is in motion, the gate will react as follows:
- If the gate is closing: The gate will stop and open
- If the gate is opening: The gate will stop and wait for the next command. If the “Auto Close” function is selected, the gate will close after the pre-set time
- If townhouse function is selected: The gate cannot be stopped while opening, other than by some form of obstruction.
-Page 18-

OPERATING PROCEDURES (CONTINUED)
- If the gate senses an obstruction while closing, the gate will stop and move to the open position. If auto close is selected, the gate will wait its allotted time and then close. If the gate senses an obstruction three times while trying to close, the gate will move ±200mm away from the obstruction position and remain there while waiting for the next command.
- If the gate senses an obstruction while opening, the gate will stop and wait for the next command. If the “Auto Close” function is selected, the gate will close after the pre-set time.
- In the unlikely event of malfunction, the battery flat or any other reason to disengage the gate from the motor, use the supplied key to unlock the release handle and move to the disengage position. The gate can now be operated manually.
- When re-engaging the gate for remote operation, move and position the gate halfway in its travel. Close the release handle and move the gate slowly by hand until a clicking sound is heard. The gearbox is now engaged and ready for use. Never engage or disengage the motor while the gate is in motion.
-Page 19-

STATUS LED/BUZZER

Figure 9
- A buzzer can be fitted to the electronic control card and acts as an audible tell-tale indicator conveying the following messages:
- Continuous beeps / LED flashes (approximately one beep every second). Gate is either opening or closing.
- Double beeps / LED flashes in succession. Indicates a main power supply problem.
- Triple beeps / LED flashes in succession. Indicates a low battery voltage.
- Approximately one beep / LED flashes 5 seconds after the gate has closed. Gate is not fully closed.
- Four flashes/beeps in succession. Override lever not engaged or reed switch faulty.
- The buzzer can be de-activated by removing the buzzer jumper from the electronic control card. See figure 9. This will have no effect on the operation of the gate.
-Page 20-

TROUBLE SHOOTING GUIDE
Should a problem occur, consult the following table first before calling your local GEMINI agent.

WARNING:
DURING SOME OF THE FOLLOWING CHECKS / TESTS, IT WILL BE NECESSARY TO WORK ON THE UNIT WHILE THE ELECTRICAL POWER IS SWITCHED ON (LIVE), THEREFORE UTMOST CARE MUST BE TAKEN TO PREVENT ELECTRICAL SHOCKS.
PROBLEMS DURING THE INSTALLATION / OPERATING PHASE
| PROBLEM | POSSIBLE CAUSE | REMEDY AND/OR TEST | |||
| a. | Battery not fully | a. | Charge battery | ||
| charged | before first operation | ||||
| System learns wrong | b. | Obstruction | b. | Identify and rectify | |
| interpreted as limit | possible obstruction | ||||
| limit position | |||||
| c. | Assist gate manually | ||||
| during learning | |||||
| phase | |||||
| a. | Is the battery | a. | Connect battery | ||
| connected? | |||||
| b. | Is the electrical | b. | Check and rectify as | ||
| Electrical motor does not | power correctly | necessary | |||
| turn | connected? | ||||
| c. | Fuse on the | ||||
| electronic control | c. | Replace with correct | |||
| card blown | value fuse | ||||
| a. | Wiring to the | a. | Check and rectify as | ||
| electronic control | necessary | ||||
| Power is ON (LED | card not properly | b. | Replace electronic | ||
| indicating) but motor | connected | control card | |||
| does not react | b. | Electronic control | |||
| card defective | |||||
| a. | Is the security code | a. | Check, and if | ||
| set correctly? | necessary, reset | ||||
| Motor operates by | security code | ||||
| b. | Remote control | b. | Replace battery | ||
| actuating the push | |||||
| battery flat | |||||
| button, but not with the | c. | Replace remote | |||
| remote control | |||||
| c. | Remote control | control | |||
| defective |
-Page 21-

TROUBLE SHOOTING GUIDE (CONTINUED)
| PROBLEM | POSSIBLE CAUSE | REMEDY AND/OR TEST | ||
| a. | Faulty wiring to the | a. | Disconnect the push | |
| push button | button wiring from | |||
| the GEMINI and | ||||
| bridge the COMMON | ||||
| and TRIG | ||||
| connections at the | ||||
| connector block. If | ||||
| motor operates, the | ||||
| wiring is faulty and | ||||
| must be repaired | ||||
| Motor activates with the | b. | Push button faulty | b. | Disconnect push |
| remote control but not | ||||
| button wiring at the | ||||
| with the push button | ||||
| push button. | ||||
| Momentarily bridge | ||||
| the wires at the push | ||||
| button. If the motor | ||||
| operates, the push | ||||
| button is faulty and | ||||
| must be repaired or | ||||
| replaced | ||||
| a. | Incorrect setting | a. | Refer to “Reversing | |
| Gate motor direction | Electrical motor | |||
| incorrect | direction” p.16 | |||
| a. | Transmitter battery | a. | Replace battery | |
| Receiver reception | flat | |||
| insufficient | a. | Receiver range is | a. | Place in different |
| obstructed | position | |||
| a. Gate too heavy for | a. | Discuss the problem | ||
| unit | with your local | |||
| GEMINI agent | ||||
| Motor opens the gate for | b. | Obstruction on track | b. | Clear obstruction |
| a short travel only, then | from track | |||
| closes again | c. | Obstruction | c. | Adjust obstruction |
| sensitivity too high | sensitivity to suit your | |||
| gate | ||||
-Page 22-

TROUBLE SHOOTING GUIDE (CONTINUED)
| PROBLEM | POSSIBLE CAUSE | REMEDY AND/OR TEST | ||
| a. | Motor has forced | a. | Disengage the | |
| the gate against the | manual override and | |||
| gatepost and | move away from | |||
| cannot release by | gatepost | |||
| itself | ||||
| b. | Stoppers incorrectly | b. | Adjust the stoppers | |
| adjusted | ||||
| Motor makes a “clicking” | c. | 16 A fuse is blown | c. | Replace fuse |
| sound but does not | A power surge has | Switch the main | ||
| switch ON | ||||
| caused a problem on | electrical power | |||
| the electronic control | switch OFF. | |||
| card | Disconnect the | |||
| battery and wait 10 | ||||
| seconds, then switch | ||||
| the power ON again | ||||
| and reconnect the | ||||
| battery | ||||
| a. | Wheel track is dirty | a. | Clean wheel track | |
| b. | Wheel track has | b. | Repair burns and/or | |
| burrs or markings | markings | |||
| c. | Insufficient free play | c. | Repair the sagging | |
| between pinion and | problem and restore | |||
| rack (wheel track | free play between | |||
| Gate moves with | has sagged). | pinion and rack | ||
| difficulty | Weight of gate is | |||
| lying on pinion | ||||
| d. | Battery faulty and/or | d. | Replace and/or | |
| flat | charge battery | |||
| b. | Faulty push button | b. | Check and rectify as | |
| wiring | necessary | |||
| c. | Faulty remote | c. | Replace the remote | |
| Gate opens and closes | control receiver | control receiver | ||
| by itself | d. | Somebody in your | d. | Change your |
| area is using the | security code, only if | |||
| same security code | using non-Gemini | |||
| as yours | transmitters |
-Page 23-

TROUBLE SHOOTING GUIDE (CONTINUED)
| PROBLEM | POSSIBLE CAUSE | REMEDY AND/OR TEST | |||
| Gate is not fully | e. | Check and if | |||
| Buzzer sounds (if fitted) | closed. Motor has | necessary, adjust | |||
| forced the gate | stoppers | ||||
| after gate has closed | |||||
| against the gate | |||||
| (approximately one beep | |||||
| post or an | |||||
| every 5 seconds) | |||||
| obstruction on the | |||||
| wheel track | |||||
| a. | Main power supply | a. | Check the following: | ||
| defective | |||||
| – | Is the main | – | Switch ON the | ||
| Buzzer sounds (if fitted) | power switched | main power | |||
| ON? | supply | ||||
| double beeps in | |||||
| – | 220V mains | – | Check and rectify | ||
| succession | |||||
| incorrectly | as necessary | ||||
| connected | |||||
| a. | Electronic control | a. Replace with fuse of | |||
| card fuse blown | the correct value | ||||
| a. | Battery voltage low | a. | Check the following: | ||
| – | Is the main | – | Switch ON the | ||
| Buzzer sounds (if fitted) | power switched | main power | |||
| triple beeps in | ON? | supply | |||
| succession | – | Trickle charger | – | Replace with | |
| fuse blown | fuse of the | ||||
| – | correct value | ||||
| a. Is the buzzer fitted? | a. | Fit buzzer | |||
| Buzzer does not sound | b. | Is buzzer jumper | b. | Fit buzzer jumper | |
| fitted? | |||||
| at all | |||||
| c. | Buzzer defective | c. | Replace electronic | ||
| control card | |||||
| a. | Faulty pulse sensor | a. | See page 28/29 | ||
| Upon activation gate | |||||
| only moves about 5mm | |||||
| and then stops | |||||
-Page 24-

MAINTENANCE
The GEMINI sliding gate opener system is a maintenance free unit and needs very little attention other than checking the gate track for obstructions (excessive dirt, sand, stones, etc.)
On a 6-monthly basis, it is advisable to remove the protection lid and blow off all accumulated dust and dirt from the unit with low pressure compressed air.
REPLACING THE REMOTE CONTROL BATTERY
- Using a small flat screwdriver, remove the rear cover from the remote control unit.
- Remove the battery from its holder.
- Check that the holder and contact points are clean (signs of corrosion, etc.).
- Fit a new battery, noting the position of the (+) and (-) end of the battery. The (-) end of the battery faces towards the spring connection.
REPLACING THE PULSE SENSOR (SEE ILLUSTRATIONS ON PAGE 29)
- Remove the protection lid
- Remove the red gearbox clip (Figure 10a)
- Disconnect the 3-way connector and connect the replacement pulse sensor (obtainable from your nearest GEMINI dealer)
- Channel the harness through the clip (Figure 10b)
- Insert the gearbox clip to its original position
- Re-program the gate opener (See page 20)
-Page 25-

REPLACING THE PULSE SENSOR
Remove the red gearbox clip (Figure 10a)

Figure 10a
Disconnect the 3-way connector and connect the replacement pulse sensor to the harness and channel through its clip. (Figure 10b)

Figure 10b
Insert the gearbox clip to its original position.
-Page 26-

STANDARD GUARANTEE
GEMINI AUTOMATION SYSTEMS supplied by DMI Engineering are warranted against defects in material and faulty workmanship for 24 months from the date of purchase. Industrial DC systems only have a 12 month guarantee.
This warranty applies only to products purchased new from DMI Engineering or its authorised dealers. This warranty does not apply to products which have been subjected to lightning, flood damage or any other freak occurrence of nature, abused, modified or repaired by someone other than DMI Engineering or its authorised dealers.
- No batteries are included in the warranty
- Electronic components have a 12 month warranty
If a GEMINI automation product proves defective in material or workmanship within the warranty period, please return it to any authorised dealer or DMI Engineering, transportation to and from DMI Engineering prepaid, enclosing your name and address, adequate proof of date of purchase and a short description of the defect. DMI Engineering, at its discretion will repair or replace the defective product free of charge. Repairs or replacements are warranted as described above for the remainder of the original warranty period. DMI Engineering’s sole liability and your exclusive remedy under this warranty is limited to repair or replacement of the defective product.
The foregoing warranty is exclusive and in lieu of all other warranties or condition, written or verbal, expressed or implied all of which are hereby disclaimed. There shall be no liability, for incidental, consequential, or special damages, or any other damages, costs or expenses, excepting only the cost or expense of the replacement or repair.
Use only authorised parts and/or accessories. Any damage or malfunction caused by the use of unauthorised parts is not covered by the warranty.
No warranty is applicable on products not registered with DMI Engineering within the prescribed time and on the correct form.
-Page 27-

WARRANTY REGISTRATION FORM
Name of user………………………………………………………
Date………………………………
Postal address: …………………………………………………………………….
……………………………………………………………………. Code: …………
Telephone No: ( )……………………………………………………………
Fax No: ( )……………………………………………………………….……
Date of installation…………………………………………………………………
Serial No of Unit……………………………………………………………………
Are you satisfied with the service provided by your dealer / installer: YES / NO Comments:……………………………………………………….…………………
……………………..…………………………………………………………………
| Please cut out and | |||
| FOR OFFICE USE ONLY | forward this Warranty | ||
| Date received:………………………… | Registration to: | ||
| File No:…………………………….…… | [email protected] | ||
| or | |||
| The Manufacturer | |||
| PO Box 36816 | |||
| Menlo Park | |||
| 0102 | |||
-Page 28-